Are you looking to embed an online map, such as Google Maps, on your web page? Well, to make the widget function properly, you will need to get an API key first. You will also need to know how to use this API key.
Therefore, in this article, we will provide you with Google Maps API key setup instructions, which will tell you how to create the API key and how you can use it.

API Keys are codes or tokens that allow one platform to communicate with another.
For example, if you are planning to embed Google Maps on your website, then to make the map embed function and act just like the original map, you will need an API key. This API Key can be created from the Google Cloud Console.
The API key will add functionality features of Google Maps, such as optimized route planning, real-time traffic conditions, dynamic map displays, map styles, advanced markers, etc. To any web page you assign it to.
An API key that is used to communicate with Google Maps, which gives a map widget and all its capabilities, is known as a Google Maps API key.
There are lots of third-party platforms that require API keys to operate a map widget on your website.
For example, a store locator software can add a store locator widget to your website. The store locator widget has a built-in Google map. Moreover, for this map to function properly, you will need a Google Maps API key.
An API key is unique to every website. Therefore, whatever API you create needs to be kept confidential. In addition, each API key is billed independently of other API keys, even if they are from the same account or origin.

Let’s now see how you can create an API token for the map embedded in your website.
Firstly, you will need to log in to the Google Maps Platform (or the Google Cloud Platform) using your Google account. Once you are there, press the “Get started” button to begin.
Once you’ve logged into Google Maps Platforms, you will need to create a new project. To create a new project, please follow the below steps:

Before you can proceed further, you will need to create a billing account by providing your credit or debit card information. Without providing your billing information, you will not be able to proceed.
To add your billing information on the Google Maps platform, please follow the below steps:


Once you have created a new project and added your billing information, you will next need to activate the API libraries for the services the Google Maps embed on your website will use.
For example, if you want to add a map widget to your website that provides directions between places, then you will need to activate the Direction API libraries.
To activate or enable a certain API, please follow the below steps:


If you want to see what API libraries you have enabled, select an API library that you previously enabled and click on the “Manage” button. You will be taken to a page that shows all the API libraries that you have enabled.
Depending on the purpose for which you are adding the map widget to your website, you will need to activate different API libraries.
For example, if you are adding a Google Maps widget via a store locator software, such as WP Maps, then you will need to activate the following libraries:
After you have enabled the required API libraries, it’s now time to create the API key.
To create an API key, please follow the below steps:


DO NOT close the pop-up window just yet because it contains a link to a section where you can restrict the API key you just created. We will get to restricting an API key in the upcoming section.
To prevent others from using your newly created API key, you will need to restrict your API key so that it only works on your specific website or domain.
To restrict an API key, please follow the below steps:


Now, the API key that you just restricted can only be used on the website domain you provided in points 7 and 8.
Now that you have created and restricted an API key, it is time to use it.
Depending on what you are planning to do, you will need to add the API key to add a Google Maps widget to your website.
Let’s take a look at a use case where someone uses the API key.
Check Related Blog: Importance Of Location Marker Icons
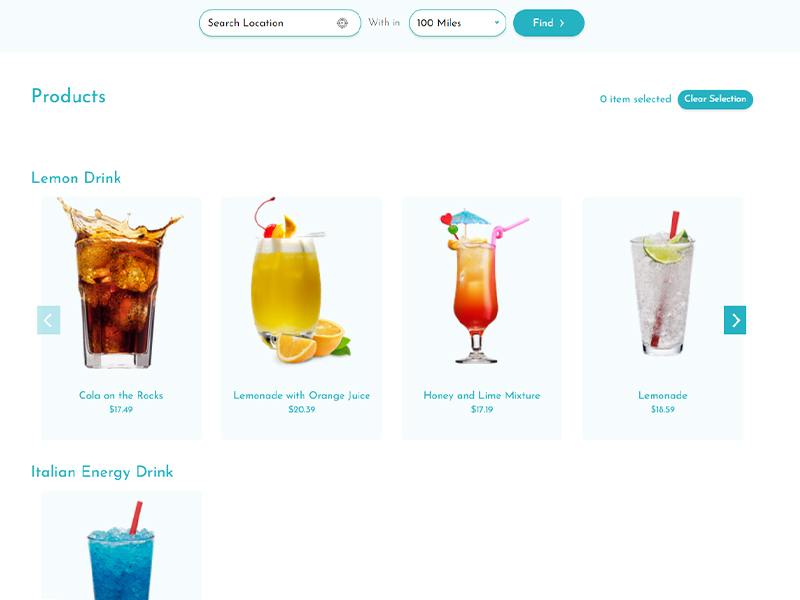
Situation: A business owner with multiple stores and a website wants to add a store locator widget to his website to help paying customers reach his physical stores.
A store locator widget is a section on a website that has the following elements:
All the above elements work together to guide customers from the website to a physical store if they want to buy a product in-store after discovering it on the website.
To add a store locator widget to his website this person can use the store locator app, WP Maps, to easily add a store locator widget to his website with minimum effort. Furthermore, WP Maps comes fully integrated with Google Maps which allows you to add many of Google Maps’s features to your website. In addition, WP Maps also comes with Mapbox integration for those users who prefer to use Mapbox.
To add the Google Maps API key to WP Maps, this person will simply need to follow the below steps:
Once the API key is added, the process is complete.
Moreover, you can read the following article to find out how to add the Google Maps API key to WP Maps.

Here is a video tutorial that details the entire process of generating an API key and then adding it to the WP Maps platform to add a store locator widget for your website.
This is just one of the many cases where a person can use an API token.
On a side note, if you are also interested in adding a store locator widget to your website, then we highly recommend using WP Maps for its affordable price, powerful features, and ease of use.

Check Related Blogs: How are tags useful in a store locator
Some people may be worried about providing their billing information to Google because they might be worried about unforeseen costs. However, you don’t have to worry about anything because you won’t be charged anything until you manually upgrade to a paid account.
Even if you upgrade to a paid account, Google will provide you with $200 worth of monthly credit, which equals 28,500 free map loads per month. Furthermore, you will only be charged if you exceed $200 worth of map-related services.
Take a look at Google’s pricing plan documentation of map services for more details about the cost of using a Google Maps API key.
If you are looking for a more cost-effective mapping solution, you can try using Mapbox instead of Google Maps to add a map widget to your website. Mapbox also has free tier usage and affordable prices when exceeding normal usage.
See the following article for a full comparison between Mapbox and Google Maps.
Moreover, this guide article will be very informative if you want to use a Mapbox API on your website.
A Google Maps API Key allows users to embed a Google Map along with its functions on a website.
Yes. While getting a Google Maps API key is free, you will still need to create a billing account using your credit card information. In addition, Google will provide you with $200 worth of free monthly credit; this equals 28,500 free map loads per month. You will only be charged after you exceed this limit.
Google Maps is arguably the most popular map API integration provider that is used on thousands of websites.
For the Google Maps API, there is no limit to the number of requests you can make per day. However, some services may have a usage limit per minute. For example, the Maps Javascript API can only process 30,000 requests per minute.
The API key itself is free. However, you will be charged for API usage. Moreover, Google will provide you with $200 worth of free monthly credit, which equals 28,500 free map loads per month. You will only be charged after you exceed this usage, and it also depends on what services you use.
If you’re planning to embed a Google Maps widget on your website, you will first need to get its API key to make the map function as a proper Google map.
Once you create the token, you will simply need to add it to the platform through which you embed the map widget.
Google provides a flexible pricing plan for each service your API key uses. In addition, you get $200 worth of free API usage per month, and you are only charged after you exceed the free limit.

Talha has 3 years of experience in writing blogs and guide articles about topics that cover e-commerce practices, WordPress plugins, and SaaS apps. His blogs are SEO-oriented and have ranked high on SERPs. His main goal is to convey complicated topics in an easy-to-understand format for his readers. Usually, this involves thoroughly researching a topic beforehand before translating it into a comprehensible article. Talha has completed his bachelor’s from the American University of Sharjah where his passion for writing and communication was sparked by learning to write about a wide range of topics such as social issues, history, and scientific methodology. His main area of expertise was writing technical papers that were easy to digest by a general audience.

Easy to Use Product and Store Locator Software for Business Owners An ideal end-to-end product and...
A store locator is one of the most useful tools a business owner can have because...